
So…you want to build a web app from scratch? First of all…don’t. If a flexible off-the-shelf solution meets your needs, you will save time and headache and maybe even money. But if you need to create flexible workflows for a custom process, then building a web app from scratch provides your team with an economical and flexible solution. It also provides a huge differentiator over your competitors.

Before considering which firm to engage or software to use, understand your responsibility in the process. The most successful web app deployments include tight collaboration between the client and software firm. Born of practical experience, here’s our seven-point build guide for clients to ensure an on-time and killer web app.
#1 – Know Thyself…and Assign Roles Accordingly
Every client brings a particular set of strengths and weaknesses to the build of a web app. Some possess a killer IT department. Some have strong processes already in place. Others are simply highly aware of what they need to improve the business run better. This type of self-awareness provides a strong first step for assigning job roles on a web app build.
At a minimum, job roles should include an executive sponsor and project manager. Hopefully, in-house IT expertise exists, but if not, most software development companies can supply this knowledge. The three most valuable client roles in a web app project are: the project manager, executive sponsor, and IT support.
| Role | Selected Duties |
| Project Manager | Provides feedback from the client’s point of view Ensure software provider meets delivery commitments. Protect against scope creep. |
| Executive Sponsor | Be part of the approval team for large milestones. Ensures the team is properly staffed. |
| IT Support | Grants access to the software provider as needed. Provides detail on assets and network configuration. |
With these roles established, a clear-eyed evaluation of staff capabilities should occur. Is the Project Manager already overburdened? Does the IT Support take a while to respond to inquiries? A successful web app project requires a fully engaged and committed client team.
Step #2 – Gather the Right Requirements
“How much will it cost?” That’s typically one of the first questions our firm receives on a custom web app project. The reality is no decent software provider will answer this question without a detailed understanding of the requirements.
And too often, the client doesn’t properly determine the requirements prior to going out for a quote. The best way to quantify requirements is through a vehicle called User Stories. User Stories allow for an unbiased way to document users’ needs, wishes, and pipe dreams.
User stories follow a simple formula: As a ___, I want to ___ so that I can ____. Greater detail in these stories allow for less ambiguity during a web app build.
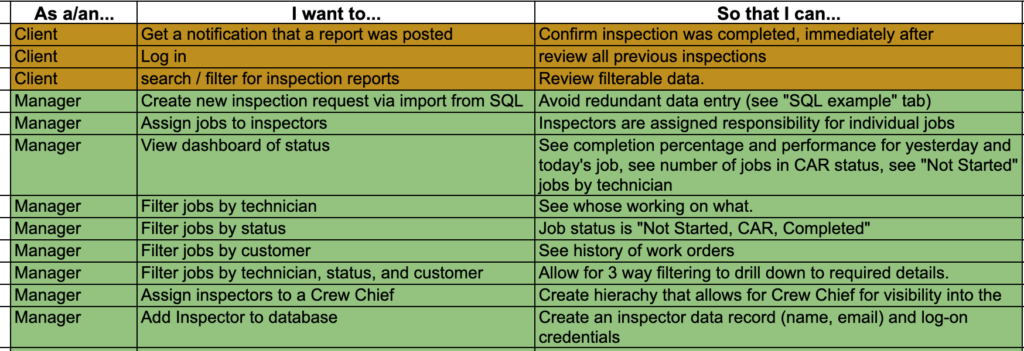
Weak user story: As an accountant, I want to see project financials so that I can make better decisions.
Strong user story: As a Project Accountant, I want to see historical margins on all projects so that I can compare them with established baseline expectations.
Don’t hastily write the user stories in a closed office. Involving each of the actual users in the process produces end user buy-in and the right features for each role. For example, for a field service app, a field service technician is a likely role. If included, make sure an actual field service technician helps define his/her role requirements.
Step #3 – Phase the Approach
So…with user stories in hand, it’s time to build a great product. Right? Not so fast. Take that long list of user stories and strip it down to the minimum viable product. The question should be: “what are the bare minimum requirements for the web app to complete the needed processes and produce minable data?
Phasing the approach helps avoid cost overruns and avoids lightly used features. Until users actually interact with the software, its hard to determine exactly what reports and data may strike their fancy.
The most instructive period of any deployed web application is the first few months after deployment. There are always a few surprises in the desired functionality, no matter how much preparation has gone into the user stories.
Step #4 – Mock it!
Building an interactive mockup allows users to fully experience the proposed application. Many users mistakingly believe a mocked up application is costly. The reality? Cultivating robust user stories and building an entire mockup clocks in at around 5% of the cost of an enterprise web application.
Allow each proposed user role to navigate the application and consider their real-world experience. Are they using an iOS or Android device? Tablets? A slow laptop? The closer that a real-world experience is simulated, the more beneficial the exercise. These mockups should be heavily reviewed in a hands-on meeting with the software provider prior to laying a single line of code.
Step #5 – Statement of Work is King
Maybe you had confidence in your needs and placed a lump sum P.O. sometime around Step 1. Maybe you opted for an exploratory contract to further define requirements via user stories and mockups. No matter the route, at some point a statement of work should be developed. A strong statement of work should include robust user stories, responsibilities, milestones, and signatures of both involved parties.
The statement of work shouldn’t be referenced at every project meeting, but rather at pre-established intervals to ensure developers and users agree on the end goal. The statement of work provides a framework for development efforts and a barometer of work completion.
Step #6 – Hands-On Please
Whenever additional functionality is made available, be sure to test it. Don’t expect the software company to fully understand the nuances of your business as they may misinterpret a specification that is second nature to your company.
Voice your opinion – about a new desired feature, speed concerns, or anything in between. The best outcomes happen when clients take responsibility for the project’s outcome.
Step #7 – Get User Buy-In
Without strong enthusiasm from the web app’s end users, the rollout will slow and perhaps even halt end-user adoption. End-user buy-in must be obtained strategically. This should have occurred in the previous six steps, but if not, it’s not too late. Clients should ensure several key end-users embrace the new technology. These employees become advocates for later adopters.
As feedback rolls in on the web app, make sure the software provider fixes the flaws quickly. Dutifully record end-user feedback on potential enhancements in a log for later review.
Once end-users have spent several months in the system and all bugs have been squashed, consider Phase 2. Try to batch all the change requests into Phase 2 rather than ask providers to make user interface changes in a piecemeal fashion. The batched approach reduces cost and ensures evaluation of potential changes occurs by the right personnel.